Checkout Integration Guide
This guide explains how to integrate the Paypercut Checkout API for a custom payment flow using Checkout Sessions. It is intended for merchants and developers building a custom website, app, or backend integration while keeping sensitive payment data on Paypercut-hosted infrastructure.
By the end of this guide, you will be able to:
- Obtain API credentials
- Create checkout sessions
- Render a secure payment page for customers using hosted or embedded checkout
- Handle webhooks and transaction notifications
- Choose the right Paypercut integration path for your setup
What Checkout API Is
The Checkout API enables merchants to accept payments through a secure Paypercut payment page that handles sensitive payment information on PCI-compliant infrastructure. It provides a flexible way to integrate online payments without exposing your systems to card data.
Checkout can also create customer-facing subscription signups. For recurring billing, see Create subscriptions with Checkout.
Checkout Experiences
Hosted Checkout
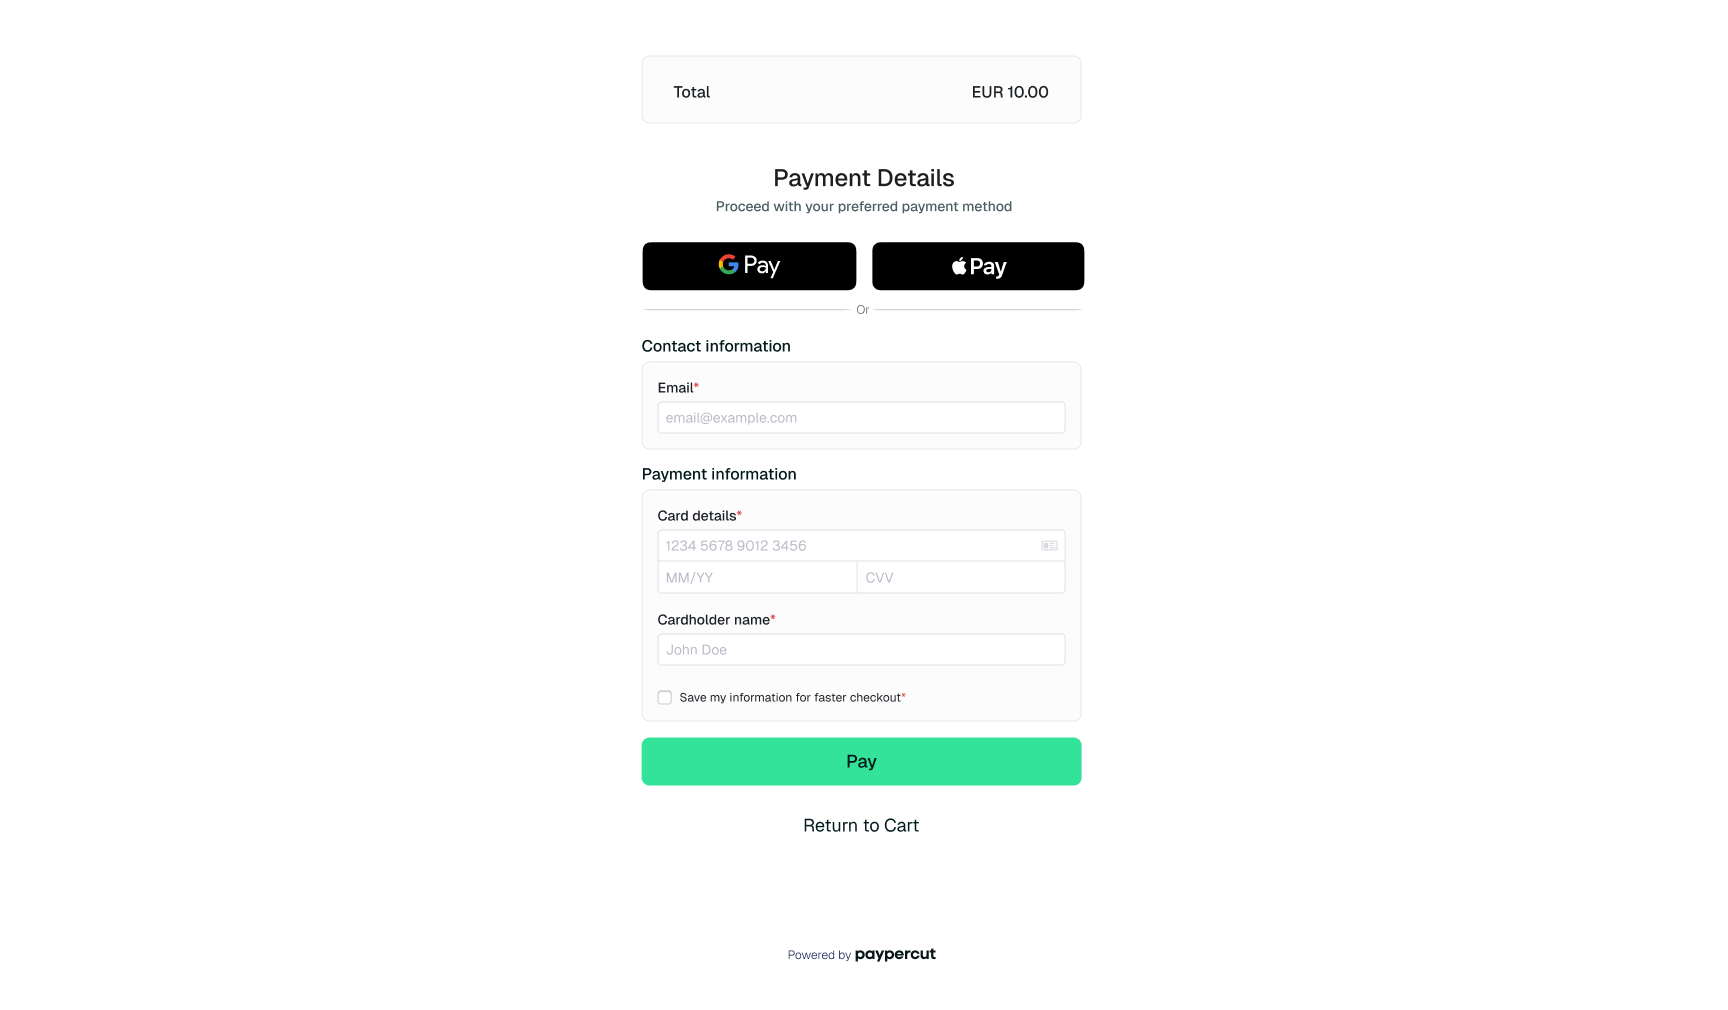
Hosted Checkout redirects the customer to a secure paypercut-hosted payment page.
With this model, the merchant creates a Checkout Session and redirects the customer to the hosted checkout page where the payment is completed.
How it works
- The merchant backend creates a Checkout Session.
- The merchant redirects the customer to the hosted checkout page.
- The customer completes the payment on the Paypercut-hosted payment page.
- Paypercut processes the payment.
- Paypercut sends a webhook notification with the payment result.
- The customer is redirected to the configured success or cancel page.
This approach requires minimal frontend implementation and is the fastest way to integrate payments.
Embedded Checkout

Use our payments SDK, paypercut/checkout-js, to embed the checkout page on your site.
Embedded Checkout renders the checkout form directly inside the merchant website or application.
Example:
Place an <iframe src="checkout_url"> on your checkout page.
html <iframe src="https://checkout.paypercut.io/session/abc123" width="400" height="600" frameborder="0"></iframe>
Instead of redirecting to a hosted page, the merchant loads the paypercut checkout experience within their own interface.
How it works
- The merchant backend creates a Checkout Session.
- The merchant site initializes the embedded checkout experience.
- The checkout form is displayed inside the merchant page.
- The customer enters payment details and confirms the payment.
- Paypercut processes the payment.
- Paypercut sends the payment result through webhooks.
- The merchant updates the UI based on the payment result.
This approach provides greater control over the user experience while still using Paypercut’s secure payment processing.
Express Checkout
Use our payments SDK, paypercut/checkout-js, to render Apple Pay and Google Pay wallet buttons directly on your page.
Express Checkout enables faster payments using wallet-based payment methods — no card form, no redirects. The customer taps a button, authenticates with Face ID, Touch ID, or their device PIN, and the payment details are collected from their Apple or Google account automatically.
How it works
- The merchant initializes the Express Checkout SDK with the order amount, currency, and shipping options.
- Apple Pay and Google Pay buttons are rendered inside the merchant page.
- The customer taps a wallet button — the native payment sheet opens.
- The customer confirms their payment card, billing address, and shipping option using biometric authentication.
- The SDK fires a
payment_method_createdevent containing apaymentMethodId. - The merchant backend receives the
paymentMethodIdand creates a Payment Intent via the Paypercut API to charge the customer. - Paypercut processes the payment and returns the result.
- The merchant updates the UI based on the payment outcome.
This approach delivers the fastest possible checkout experience for customers who have Apple Pay or Google Pay configured, while keeping the merchant's integration lightweight and PCI-compliant.
Note: The
paymentMethodIdreturned by the SDK is a single-use token. Your backend must create a Payment Intent with it promptly after receiving the event. See the Create Payment Intent API for the full request reference.
Key Features:
- Secure payment processing on a PCI-compliant page
- Multiple payment methods: credit/debit cards, digital wallets
- Real-time notifications via webhooks
Note:
Custom branding for checkout pages is available upon request.
For full API details, see the Checkout API Documentation.
Core Integration Flow
- Create a checkout session via the API.
- Render the payment page:
- Redirect: Redirect the customer to the checkout URL returned by the API.
- Embedded: Use our payments SDK paypercut/checkout-js to embed the checkout page on your site.
- Choose a capture mode: Use automatic capture by default, or manual capture if you want to capture funds later after pre-authorization.
- Customer completes payment securely on the Paypercut page.
- Receive real-time notifications via webhooks for transaction status.
- Redirect customer back to your site after payment (success/cancel) via your
success_urlorcancel_url.
Integration Steps
1. Obtain API Credentials
- Log in to your Merchant Dashboard.
- Go to API Keys and create new keys for sandbox (testing) and production (live).
2. Create a Checkout Session
- Send a
POSTrequest to/v1/checkoutswith required parameters. - Example request:
{ "amount": 1000, "currency": "EUR", "success_url": "https://yourdomain.com/checkout/success", "cancel_url": "https://yourdomain.com/checkout/cancel", "line_items": [ { "name": "Product", "amount": 1000, "quantity": 1 } ] } - The response will include a checkout URL.
3. Render the Checkout
-
Redirect:
Redirect the customer to the checkout URL. -
Embedded: Initialize the checkout using our payments SDK, paypercut/checkout-js.
const checkout = PaypercutCheckout({
  id: '01KB23M9EC960C50G3AH14FTTT', // Your checkout session ID from step 1
  containerId: '#checkout' // CSS selector or HTMLElement
});
4. Payment Capture Modes
When creating a checkout session, you can choose how and when funds should be collected from the customer's payment method.
Automatic capture
Automatic capture is the default behavior. The payment is captured immediately after authorization.
Typical use cases:
- Online stores
- Event ticketing
- Digital goods
- One-time SaaS payments
- Membership signups with a fixed amount
- Other fixed-amount purchases
Manual Capture
Manual capture authorizes the payment during checkout and captures it later, once the final amount is confirmed.
This is useful for scenarios such as EV charging, hospitality, or any flow where the final amount may change after authorization.
When capture_method=manual is used, the payment lifecycle has two steps:
- Confirm the Payment Intent: pre-authorize the card Confirm Payment Intent
- Capture the Payment Intent: collect the final amount Capture Payment Intent
Typical use cases:
- EV charging sessions
- Hospitality and hotel bookings
- Metered or usage-based services
- Utility billing with a final amount confirmed after usage
- Orders that require a final amount check before capture
- Services requiring approval before funds are collected
To enable manual capture, set payment_intent_data.capture_method to manual when creating the Checkout Session.
Request example:
{
  "amount": 10050,
  "currency": "EUR",
  "success_url": "https://myshop.com/success",
  "cancel_url": "https://myshop.com/cancel",
  "mode": "payment",
  "ui_mode": "hosted",
  "payment_intent_data": {
    "capture_method": "manual"
  }
}
Response example before capture:
{
  "id": "pi_01KB23MA6A5B8M4PJ9XQ7K2ABC",
  "amount": 10050,
  "capture_method": "manual",
  "on_behalf_of": "acct_merchant_123",
  "statement_descriptor": null,
  "setup_future_usage": "off_session",
  "payment_method": null,
  "customer": null,
  "amount_capturable": 10050,
  "amount_received": 0,
  "currency": {
    "iso": "eur",
    "scale": 2
  },
  "status": "requires_capture",
  "created": "2026-03-16T15:20:01.419Z",
  "updated": "2026-03-16T15:20:02.101Z",
  "livemode": false,
  "next_action": null,
  "latest_payment": "01KB23MB8Q4Q1JYRT2XH9K7DEF",
  "cancellation_reason": null,
  "canceled_at": null
}
Response example after capture:
This is the response from POST /v1/payment_intents/{id}/capture:
{
  "id": "pi_01KB23MA6A5B8M4PJ9XQ7K2ABC",
  "amount": 10050,
  "capture_method": "manual",
  "on_behalf_of": "acct_merchant_123",
  "statement_descriptor": null,
  "setup_future_usage": "off_session",
  "payment_method": null,
  "customer": null,
  "amount_capturable": 0,
  "amount_received": 10050,
  "currency": {
    "iso": "eur",
    "scale": 2
  },
  "status": "succeeded",
  "created": "2026-03-16T15:24:10.102Z",
  "updated": "2026-03-16T15:24:10.398Z",
  "livemode": false,
  "next_action": null,
  "latest_payment": "01KB23MB8Q4Q1JYRT2XH9K7DEF",
  "cancellation_reason": null,
  "canceled_at": null
}
Recommendations for common use cases:
- When the final amount may be lower than the initial estimate: Authorize the expected maximum amount first, then capture the final amount later. Paypercut supports capturing an amount that is less than or equal to the authorized amount.
- When the final amount is uncertain: Consider using a higher initial authorization amount to account for potential increases, while ensuring it remains within acceptable limits.
- When the final amount may be slightly higher than the initial estimate: A practical approach is to authorize a slightly higher buffer upfront and capture the final amount afterward, as long as it does not exceed the authorized amount.
- When the final amount may increase beyond the original authorization: Paypercut currently supports pre-authorization, but not incremental authorization on an existing hold. In these cases, the recommended workaround is to cancel the initial authorization and create a new one for the updated amount.
- For variable-amount flows such as EV charging or metered services: Design the checkout flow around an estimated authorization strategy or a cancel-and-reauthorize flow when the final amount may exceed the original hold.
With this configuration:
- The payment is authorized during checkout
- The funds are reserved on the customer's card
- The payment is not captured immediately
Payment Intent lifecycle:
- Confirm / authorize/pre-authorization: In checkout integrations, confirmation is typically performed automatically when the customer submits payment details on the checkout page.
- Capture funds: Call
POST /v1/payment_intents/{id}/capturewhen you are ready to collect the funds.
See the Checkout Sessions API Reference for the capture_method parameter and related fields.
Webhooks
- Configure a webhook endpoint in your dashboard to receive payment status updates.
- See Webhooks Guide for payloads and validation.
Use Cases
| Merchant Type | Scenario | Benefit |
|---|---|---|
| Online Store | Accepting payments for products | Fast checkout, PCI-light, easy integration |
| SaaS Platform | One-time payments | Seamless user experience, flexible API-based integration |
| Event Organizer | Selling tickets online | Streamlined sales, instant confirmation |
| EV Charging Operator | Authorize first, capture after session | Supports variable final amounts with manual capture |
| Utility Provider | Online bill payments | Convenient for customers, reduces manual processing |
| Membership Club | Collecting membership fees | Easy signup and renewal flows with a custom checkout |
Testing
- Use sandbox API keys and test cards to simulate payment flows.
- For test cards and sandbox scenarios, see the Testing Guide.
- For request and response details, see the Checkout Sessions API Reference.
Related Platform Integrations
If you are using a supported e-commerce platform rather than building a custom integration, use the platform-specific guides instead:
For custom websites, apps, or server-side integrations, this Checkout API guide is the correct starting point.
Support & Resources
Ready to get started?
Log in to your Merchant Dashboard and create your first checkout session!